Vendor Compliance Management: A Practical Guide
Karla · · 11 min read
Vendor compliance management is the routine that makes sure every vendor you hire has the insurance, licenses, and paperwork your contracts require, and keeps having them for as long as they work for you. Most small operations teams have no compliance department, so the job lands on whoever handles vendors, on top of everything else. This guide lays out a process a small team can actually run: decide what each vendor needs, collect it, check it, track it, and act when something lapses.
This article is general information, not legal or insurance advice. Check your contracts and talk to your insurance broker or attorney about your situation.
What vendor compliance management covers
At its simplest, vendor compliance management answers one question for every vendor, every day: are they allowed to be working for us right now, on the terms we agreed?
In practice that means keeping current copies of documents like these:
- Certificates of insurance, usually an ACORD 25 for liability coverage, showing general liability, workers compensation, auto, umbrella, or professional liability.
- Tax forms, mainly the IRS Form W-9 for US vendors you pay.
- Licenses: business licenses, contractor licenses, professional licenses.
- Certifications that matter for the work, such as OSHA training cards or ISO certificates.
- Agreements: the master services agreement, an NDA, and for healthcare a business associate agreement (BAA).
It is not the same as vendor selection or performance management. You can have a vendor who does great work and is still out of compliance because their insurance expired last Tuesday. Compliance is the paperwork floor under the relationship. If you want the full list by document type, see the vendor compliance checklist.
Why vendor compliance slips in small teams
Nobody decides to let a certificate lapse. It happens because of how the work is set up:
- Documents arrive by email and sit in someone’s inbox, or in a shared folder with names like
scan_0042.pdf. - Expiration dates live in one person’s head or one person’s spreadsheet. When that person is on vacation, nobody is watching.
- Requirements are vague. “Vendors must carry insurance” doesn’t tell anyone what to check.
- Nobody connects compliance to payment. Accounts payable pays the invoice because the work was done, even though the vendor’s coverage ran out two months ago.
- Vendors get added informally. A property manager calls a plumber for an emergency, and the plumber becomes a regular without ever sending a certificate.
The fix isn’t more effort. It’s a short, repeatable process with a clear owner.
How to build a vendor compliance management process
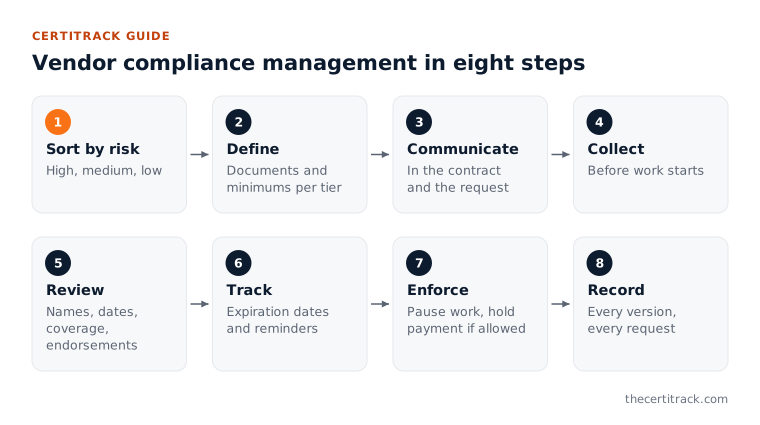
The steps below work whether you have 10 vendors or 100. Each one is small. The value comes from doing all of them, every time.
Step 1: Sort vendors by risk
Not every vendor needs the same paperwork. A roofer working two stories up on your building carries different risk than a consultant who joins a video call once a month. Sorting vendors into a few tiers keeps you from over-asking low-risk vendors and under-asking high-risk ones.
| Tier | Typical vendors | What drives the risk |
|---|---|---|
| High | Roofing, electrical, HVAC, general contractors, tree work, anyone with heavy equipment | Work on your property, injury risk, property damage |
| Medium | Cleaning crews, landscapers, on-site IT technicians, delivery and courier services | Regular presence on site, vehicles, access to your space |
| Low | Off-site consultants, software subscriptions, office supply vendors | Little or no physical presence; risk is mostly data or advice |
Three tiers is plenty. If a vendor doesn’t fit cleanly, put them in the higher tier.
Step 2: Decide what each tier must provide
For each tier, write down the documents you require and what “acceptable” means for each one. For insurance, that usually means coverage types and minimum limits, often written as per-occurrence and aggregate amounts. The right numbers depend on your contracts, the work, and your broker’s advice, so set them with your broker rather than copying someone else’s list.
A simple requirement sheet might look like this:
| Document | High | Medium | Low |
|---|---|---|---|
| Certificate of insurance (general liability) | Required | Required | Case by case |
| Workers compensation | Required | Required if they have employees on site | Not usually |
| Commercial auto | Required if vehicles on site | Required for delivery | Not usually |
| Umbrella or excess liability | Often required | Case by case | Not usually |
| Professional liability (E&O) | If they design or advise | If they advise | Often required for consultants |
| W-9 | Required | Required | Required |
| License for the trade | Required where the state or city requires one | Where required | Where required |
Step 3: Put the requirements in writing
Requirements only help if the vendor knows about them before they start. Put them in the contract or a short requirements letter, and include them in the email you send when you request documents. Spell out:
- Which documents you need, and the minimum coverage for each.
- The exact certificate holder name and address you want on certificates.
- Any endorsements you require, such as additional insured or waiver of subrogation.
- That documents must stay current for the length of the relationship, and renewals must be sent before the old ones expire.
- What happens if they lapse (for example, work pauses and payments are held until you receive current documents).
Step 4: Collect documents before work starts
The easiest time to get documents is before the first job, when the vendor wants the work. After they’ve started, your bargaining power drops and the request slides down their list.
Make “documents on file” a gate. No purchase order, no site access, no first job until the required items are in. For emergency vendors, set a short deadline (say, before their invoice gets paid) and stick to it.
Make it easy for the vendor to send things. Many small vendors don’t have an office manager. If uploading a certificate means creating an account somewhere, it won’t happen. A direct link where they can upload a file from their phone works far better than a back-and-forth email chain. CertiTrack, for example, sends the vendor a secure link where they upload documents from any device with no account needed.
Step 5: Review what comes in
Receiving a document is not the same as checking it. For every certificate of insurance, compare it against your requirements:
- Is the insured name the vendor you actually contracted with (same legal name)?
- Are the policy effective and expiration dates current?
- Are the required coverage types there, with limits at or above your minimums?
- Is the certificate holder your company, with the right name and address?
- If you require additional insured status or a waiver of subrogation, is the endorsement itself attached?
That last point needs a human. A checkbox in the ADDL INSD or SUBR WVD column of an ACORD 25 is not proof. The certificate says plainly that it is issued for information only and does not change the policy. Ask for the endorsement page, read it, and if anything is unclear, ask your broker. If you’re new to these forms, start with how to read an ACORD 25.
For licenses, check the license number against the issuing state or city board where they offer an online lookup. For W-9s, check that the form is signed and the name matches the vendor you’re paying.
Step 6: Track expiration dates and renewals
Many compliance failures aren’t missing documents. They’re documents that were fine when you got them and then expired. Insurance policies commonly renew every year, licenses on their own cycles, and certifications on others.
For every document that expires, record the expiration date and set reminders well ahead of it. A sequence that works: a first reminder 90 days out, then 60, 30, and 7 days before expiry. Early reminders give the vendor time to get the renewal certificate from their agent. The later ones are for the vendors who ignored the first ones.
This is the step where spreadsheets usually break, because a spreadsheet doesn’t send anything by itself. Someone has to open it, sort by date, and write the emails. For a deeper look at certificates specifically, see the certificate of insurance tracking guide.
Step 7: Enforce it, including at payment time
A requirement you never enforce is a suggestion. Decide in advance what happens when a vendor falls out of compliance, and write it into your process:
- Notify the vendor in writing, with what’s missing and a deadline.
- Contact their insurance agent if it’s a certificate. The agent’s contact details are in the producer section of the ACORD 25, and agents can often send a current certificate quickly.
- Pause new work until documents are current.
- Hold payment where your contract allows it, until current documents are on file.
- Escalate to whoever owns the vendor relationship, so the decision about whether work continues is made on purpose, not by default.
Payment is the strongest lever most small teams have, and the one they forget. The person approving invoices should be able to see whether a vendor is compliant before releasing money. In CertiTrack, marking a payment as paid to a vendor who isn’t compliant brings up a warning first, so that check happens at the moment it matters.
Step 8: Keep records you can find later
If there’s ever a claim, a dispute, or an audit by a client or lender, you’ll want to show what the vendor had on file on a specific date. Keep:
- Every version of every document, not just the latest. The certificate in force on the day of an incident matters more than today’s.
- When you received it and who reviewed it.
- Your requests and reminders, with dates.
- Any exceptions you approved, and who approved them.
A shared folder can work if it’s organized by vendor and documents are renamed with the type and expiration date. The problem is discipline: one person saving files to their desktop breaks it.
Who should own vendor compliance
Pick one owner. Not a committee, not “whoever sees the email.” In small companies this is usually an operations manager, an office manager, or a project coordinator.
The owner doesn’t have to do every task, but they’re responsible for:
- Keeping the requirement sheet current (and reviewing it with the broker once a year).
- Making sure new vendors don’t start without documents.
- Following up when reminders get ignored.
- Telling accounts payable and project leads who isn’t compliant.
Write down a backup person too. Vacations and turnover are when vendor compliance quietly falls apart.
The process on one page
| Step | What you do | When |
|---|---|---|
| Sort | Assign each vendor a risk tier | When the vendor is added |
| Define | Set required documents and minimums per tier | Once, reviewed yearly with your broker |
| Communicate | Put requirements in the contract and request email | Before the first job |
| Collect | Get every required document | Before work starts |
| Review | Check dates, names, coverage, limits, endorsements | When each document arrives |
| Track | Record expiration dates and send reminders | 90, 60, 30, and 7 days before expiry |
| Enforce | Pause work and hold payment for lapses | As soon as something lapses |
| Record | Keep every version and every request | Always |
Spreadsheet or software?
A spreadsheet is a reasonable start if you have a handful of vendors and one careful person running it. Set up columns for vendor, document type, expiration date, and status, and add conditional formatting so anything inside 30 days turns a color.
You’ve outgrown it when:
- You have more vendors than you can review in one sitting.
- More than one person needs to update it, and you’re never sure which copy is current.
- Reminders depend on someone remembering to check.
- Vendors send documents to different people’s inboxes.
- Accounts payable can’t see compliance status before paying.
Dedicated software handles the parts people forget: reading dates off the document, sending reminders on schedule, giving vendors an upload link, and flagging a non-compliant vendor before you pay. CertiTrack’s Free plan covers up to 5 vendors, so you can test the process on your highest-risk vendors first; see pricing for larger plans. If you work in a specific field, the construction, property management, and healthcare pages list the documents that usually matter there.
Common questions
How often should vendor documents be reviewed?
Review each document when it arrives and again when it’s renewed. Review your requirements themselves at least once a year, ideally when your own insurance renews, since your broker can tell you whether your minimums still make sense.
What if a long-time vendor refuses to provide documents?
Explain that the requirement applies to every vendor, not just them, and that it protects both sides. If they still refuse, it’s a business decision for whoever owns the relationship. Make that decision on purpose and write it down, rather than letting the gap sit unnoticed.
Do I need vendor compliance for one-time vendors?
If they work on your property or handle anything that could cause injury or damage, yes, at least a certificate of insurance before they start. For low-risk, one-time purchases, a W-9 for payment may be all you need.
Is a certificate of insurance enough proof of coverage?
It’s evidence, not a guarantee. A certificate is a snapshot of coverage on the date it was issued and doesn’t change the policy. For requirements like additional insured status, you need the endorsement from the policy itself.
Who is responsible if a vendor’s insurance lapses?
The vendor is responsible for keeping their coverage, but if they cause damage while uninsured, the cost can end up with you. Your contract and your own insurance decide how that plays out, which is why it’s worth reviewing both with your broker or attorney.